


How to Pluck a Frontal Wig to Get an Ultra-Natural Look
- Sofia Jones
- 17 hours ago
- 6 min read

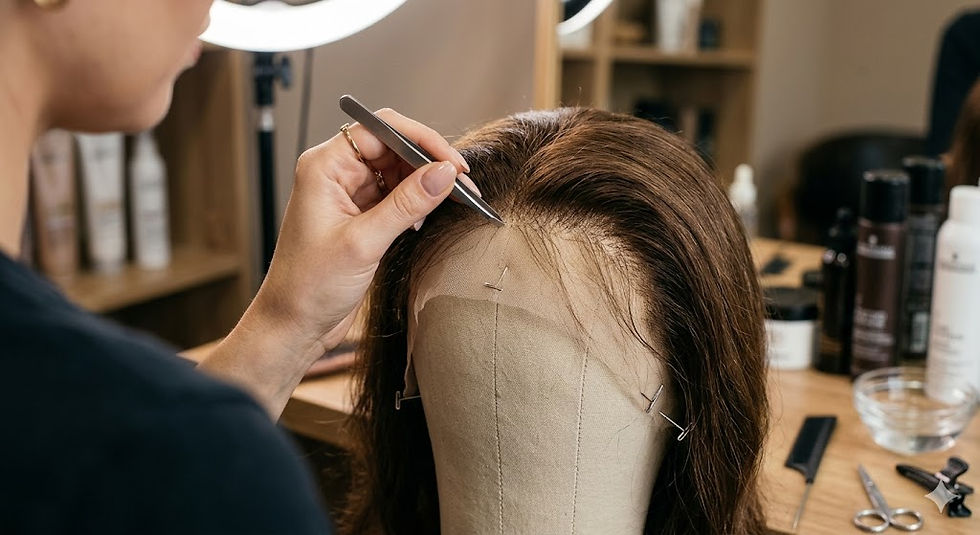
Have you ever put on a brand-new lace wig, looked in the mirror, and felt like something was slightly off? It is a common frustration. Often, fresh-out-of-the-box front lace wigs arrive with dense, perfectly straight, and unnaturally thick hairlines. Instead of mimicking how hair actually grows from the human scalp, the hair looks blocky, heavy, and undeniably obvious.
The secret to transforming a standard unit into a breathtaking, undetectable masterpiece lies in a single customisation technique: plucking.
Plucking is the process of using tweezers to strategically remove excess hair strands from the lace transition area. When done correctly, it creates a realistic, graduated density that mirrors a natural hairline—gradually building from thin, sparse hairs at the very front to full thickness further back. Whether you are rocking a protective style for the first time or you are a seasoned wig enthusiast, learning how to pluck a frontal wig is the ultimate game-changer for achieving a seamless finish.
In this comprehensive guide, we will break down the exact, step-by-step method professionals use to customise frontals, outline the essential tools you need, and highlight the pitfalls to avoid so you don't accidentally ruin your investment.

What is a Frontal Wig and Why Does It Require Plucking?
Before diving into the physical customisation process, it helps to understand the canvas you are working with.
What is a Frontal Wig?
To answer simply: what is a frontal wig? A frontal wig features a piece of lace that extends completely from ear to ear, typically measuring 13 inches across and 4 to 6 inches back. The individual hair strands are hand-tied into the tiny holes of the lace mesh. Because the lace covers your entire natural hairline, it gives you complete parting flexibility—allowing you to wear your hair in deep side parts, half-up styles, or swept straight back.
The Problem with Frontal Hairlines
While the construction of front lace wigs offers incredible versatility, frontal manufacturing processes tend to distribute the hair evenly across the entire lace piece. In nature, human hairlines are imperfect. They feature varying densities, subtle irregularities, and a soft gradient where the hair is naturally much thinner around the temples and the forehead. Plucking mimics these natural imperfections, removing the harsh "wall of hair" appearance and creating the illusion that the strands are growing directly from your own scalp.
The Ultimate Toolkit for Customising Your Wig
Attempting to pluck a unit without the proper setup is a recipe for frustration and torn lace. Before you begin, gather these essential, budget-friendly tools:
A High-Quality Tweezers: Opt for a pair with a slanted tip and a comfortable grip. Ensure the edges are clean and sharp enough to grab individual hairs without slipping.
A Canvas or Styrofoam Mannequin Head: This provides a stable base to mimic the shape of a human skull, ensuring your spacing remains accurate.
T-Pins: These hold the lace firmly in place on the mannequin head so it doesn't shift while you work.
A Rattail Comb: The long, pointed metal or plastic handle is perfect for parting clean, precise sections of hair.
A Spray Bottle Filled with Water: Wetting the hair makes it significantly easier to separate layers and see the true density of the hairline.
Styling Clips or Hair Ties: Essential for keeping the bulk of the long hair pulled back out of your workspace.

Step-by-Step Guide to Plucking a Frontal Wig Like a Pro
Achieving a flawless melt takes patience. Work slowly, check your progress frequently, and follow these steps carefully to ensure a beautiful, natural gradient.
Step 1: Secure and Prep the Unit
Place your wig onto the mannequin head. Pull the lace forward so it sits naturally along the forehead area of the block, and secure it firmly in place using T-pins along the sides and back.
Brush all the hair backwards away from the face to expose the forehead hairline completely. Lightly mist the front two inches of the hair with water. Wetting the strands prevents static flyaways and gives you a crystal-clear view of the knots tied into the lace.
Step 2: Bleach the Knots (Optional but Recommended)
For the most realistic illusion, the tiny dark knots where the hair is tied to the lace should match your skin tone. If your unit did not come pre-bleached, applying a professional hair bleach mixture to the underside of the lace for 15 to 20 minutes before plucking will make the knots disappear. If you skip this step, don't worry—proper plucking still drastically improves the look, and you can conceal remaining visible knots later using a little bit of powder foundation that matches your skin tone.
Related Article: No Stylist Needed: How to Install Lace Front Wigs at Home Like a Pro
Step 3: Pluck the Initial Hairline Edge
With the hair damp and brushed straight back, start plucking the very edge of the hairline.
Crucial Technique Rule: Never hold the tweezers in one spot, and never pluck repeatedly in a straight line. This creates noticeable bald patches. Instead, keep your hand in constant motion, using a light, swift plucking motion to skip across the hairline randomly.
Focus on creating an irregular, natural shape. Pay close attention to the temple areas, which are naturally more recessed on a human head than the centre of the forehead.
Step 4: Section out the Front Layer
Using the metal tip of your rattail comb, create a very thin part about a quarter of an inch behind the front edge of the hairline. Flip this thin layer of hair forward over the face of the mannequin.
Now, look at the thick row of exposed hair behind that part. This is where the bulk of the customisation happens.
Step 5: Thin the Density in Layers
Working on the exposed hair behind your first section, begin plucking to thin out the density.
Hold the tweezers at a 45-degree angle to avoid puncturing the delicate lace mesh.
Tweak the hair starting a small distance away from the root rather than yanking directly at the lace surface.
Pluck every second or third strand, moving dynamically from ear to ear.
Once you have thinned out that section, create another thin part a quarter-inch further back, flip it forward, and repeat the process. Working in 3 to 4 thin layers ensures you create a beautifully smooth transition from thin hair at the front to full thickness at the crown.
Step 6: Create Realistic Baby Hairs
Once the overall density looks light and airy, brush all the hair back to evaluate your work. If you prefer a styled, laid look, separate a very sparse, thin layer of hair along the immediate front perimeter. Use shears to cut these strands diagonally, leaving them roughly one to two inches long. These will serve as your baby hairs, which can be styled later using a lightweight edge control or foaming mousse.
Pros, Cons, and Crucial FAQs of Plucking Front Lace Wigs
Customising your hair is incredibly rewarding, but it requires balancing the benefits against a few practical structural realities.
The Advantages of Customization
Undetectable Realism: It completely eliminates the telltale "wiggy" look, making the lace blend seamlessly with your skin.
Styling Versatility: A thinned-out hairline allows you to part your hair in any direction without exposing a thick, unnatural edge.
Boosted Confidence: A realistic install allows you to wear your hair out in public without worrying about the wind blowing your hair back.
The Disadvantages to Keep in Mind
Shortened Unit Lifespan: Every hair strand you pluck out is permanently gone. Because front lace wigs naturally shed a little bit over time due to washing and brushing, an aggressively plucked unit may begin to look balded sooner than an unplucked one.
Risk of Damaging the Lace: Rough handling, pulling too hard, or using sharp tweezers at the wrong angle can tear holes directly into the delicate lace foundation.
Frequently Asked Questions
How can I prevent tearing the lace while plucking?
Always maintain a light grip on your tweezers and keep them at a shallow angle relative to the lace. If you experience resistance, stop pulling immediately. Ensure you are only gripping the hair shaft, not pinching the underlying lace material.
Can I pluck a wig while it is directly on my head?
It is highly recommended to use a mannequin head for the main customisation process. Trying to pluck your own hairline while wearing the unit makes it very difficult to judge symmetry, manage texturing depth, and control the angle of the tweezers safely.
What should I do if I accidentally create a small bald spot?
Don't panic! Minor mistakes can easily be hidden. You can use a dark brown or black eyeshadow or an eyebrow pencil to fill in the space on the lace, or strategically style your baby hairs to sweep over and conceal the sparse area.

Conclusion: Patience Leads to Flawless Results
Plucking a frontal wig is an art form that transforms an ordinary hairpiece into a completely personalised, natural-looking crown. The key to mastering this technique is patience and moderation. It is always better to under-pluck during your initial session, try the wig on your head to check the visual blend, and go back to remove more hair later if needed. By working in thin, careful layers, keeping your tweezers moving dynamically, and respecting the delicacy of the lace, you will create a beautifully melted hairline that keeps everyone guessing whether it is a wig or your own natural hair.


Comments