top of page
Search
Double-Drawn Bundles

The iconic 90s bombshell blowout is back, and it is dominating social media feeds, red carpets, and local salons this summer. Think of the airy, bouncing, high-volume layers popularised by 90s supermodels—thick from the roots all the way to the ends, full of movement, and radiating effortless luxury.


If you have ever tried to recreate this high-volume look with standard hair bundles, you might have noticed a frustrating problem: the top of your hair looks wonderfully full, but the layers toward the bottom look thin, wispy, or slightly see-through.


The secret to fixing this doesn't lie in using more hairspray or a bigger round brush. It lies entirely in the type of hair bundles you choose. To truly nail that thick, iconic 90s shape, you need double-drawn hair.


In this comprehensive guide, we will break down exactly why double-drawn hair bundles are essential for high-volume layered styles, how they compare to single-drawn alternatives, and how to pick the best human hair bundles to secure the ultimate summer blowout.


What Exactly Does "Double-Drawn" Mean

What Exactly Does "Double-Drawn" Mean?

To understand why double-drawn hair changes the game for layered styles, we have to look at how hair bundles are processed.

Single-Drawn vs. Double-Drawn Hair

Most standard hair on the market are single-drawn. In a single-drawn bundle, the hair is collected from the donor and washed, but the shorter hairs naturally present throughout the bundle are left inside. This means a 20-inch single-drawn bundle contains a mix of lengths—some hairs might be 14 inches, some 16 inches, and only a small percentage actually reach the full 20 inches. As a result, the bundle is thick at the top but naturally tapers out, becoming significantly thinner at the bottom.

Double-Drawn hair, on the other hand, undergoes an intensive manual sorting process. Workers meticulously remove the shorter hairs by hand from the top and bottom of the bundle. This ensures that the vast majority of the hairs in a 24-inch bundle are exactly 24 inches long.

The Visual Difference

Because the shorter lengths are removed, a double-drawn bundle maintains the exact same thickness from the tracks all the way down to the tips. It gives you a dense, uniform baseline of hair that looks naturally full, healthy, and incredibly luxurious.


The Anatomy of the 90s Blowout: Why Thickness to the Ends Matters

The defining feature of a 90s layered haircut is uniform, cascading volume. Unlike modern texturized shags or thin, piecey layers, the 90s look relies on blunt, heavy perimeters that are sweeping and full.

If you attempt to cut heavy, face-framing layers into single-drawn hair, the shears will quickly eat away at the already-thin ends. You will end up with stringy, detached layers that look disconnected from the rest of your hair.

Here is why double-drawn hair is the non-negotiable foundation for this specific aesthetic:

  • Uniform Density After Cutting: Because double-drawn bundles are thick from top to bottom, your stylist can cut short, medium, and long layers into the hair without sacrificing the weight of the perimeter. The bottom layer remains thick and impactful.

  • Maximum Bounce and Swing: Heavy hair bounces better. When the ends of your hair carry weight, they retain the curl from a roller set or blowout much longer than thin, tapered ends, which tend to fall flat under summer humidity.

  • Flawless Blend with Natural Hair: If your natural hair is thick or cut into a blunt style, single-drawn bundles will leave a visible "ledge" where your real hair ends and the bundles begin. The solid weight of double-drawn hair creates a seamless transition.


Finding the Right Texture

Finding the Right Texture: From Silk Presses to Curly Bundles

While the classic supermodel blowout is usually pictured on smooth, straight textures, the 90s layered look translates beautifully across all hair types. The key is sourcing high-quality bundle deals that provide the density required for your desired look.

The Straight and Body Wave Approach

For a traditional, glass-shine blowout, choosing high-grade straight or body wave human hair bundles is your best bet. Because double-drawn hair is so full, you will typically need fewer bundles to achieve a massive look. While you might need four single-drawn bundles to make a long style look full, two or three premium double-drawn bundles are often more than enough to achieve incredible fullness.

The Curly 90s Bombshell Look

Don't sleep on texture! Big, layered curly hair was another massive 90s staple. Utilising curly hair bundles or defined curly bundles cut into layered shapes creates an absolute powerhouse of volume.

When you use double-drawn curly hair bundles, the uniform length prevents the curls from looking frizzy or sparse at the bottom. Instead, the layers stack perfectly on top of each other, giving you a rounded, high-glamour halo of curls that bounce together organically.


Pros, Cons, and Frequently Asked Questions

Investing in premium hair is a big decision. To help you determine if this option fits your style goals, we have outlined the core advantages, drawbacks, and common questions below.

The Advantages (Pros)

  • Unmatched Longevity: Because the weak, short hairs are removed, double-drawn bundles suffer from less tangling, matting, and splitting, allowing them to last for over a year with proper care.

  • True to Length: You get exactly what you pay for. A 20-inch double-drawn bundle looks like a true 20-inch style, whereas a single-drawn bundle often looks like an 18-inch style with thin hairs hanging lower.

  • Fewer Bundles Needed: The density per bundle is much higher, meaning your install feels lighter on your scalp while looking twice as full.

The Drawbacks (Cons)

  • Higher Initial Cost: The manual labor required to sort the hair means double-drawn options carry a premium price tag compared to standard bundles.

  • Slightly Heavier Weight: Because there is more hair packed into the ends, a full install can feel slightly heavier than tapered hair during the first few days of wear.

Frequently Asked Questions (FAQs)

Can I use single-drawn bundles for layers if I buy longer lengths?

You can, but it is less efficient. Some people buy a 24-inch single-drawn bundle and cut off the bottom 4 inches to make it look thicker. However, this means you are paying a higher price for length you end up throwing in the trash. Buying double-drawn hair directly saves you money and hair waste.

How many double-drawn bundles do I need for a full look?

For a standard install (14 to 20 inches), two to three bundles are usually perfect. If you are going for ultra-long lengths past 22 inches, three to four bundles will guarantee that your 90s layers stay completely thick from root to tip.

Does double-drawn hair require special maintenance?

Not extra maintenance, but high-quality maintenance. Because it is 100% human hair, you should treat it like your own. Use sulfate-free shampoos, apply lightweight leave-in conditioners to protect against summer heat, and always sleep with a silk or satin bonnet to prevent friction.


High-volume 90s layered look

Conclusion: The Ultimate Investment in Your Hair Goals

Achieving the perfect, high-volume 90s layered look is all about setting yourself up for success before you even sit in the stylist's chair. While single-drawn hair works well for heavily textured, thin shags or highly tapered cuts, it simply cannot deliver the jaw-dropping, thick perimeter required for a true bombshell blowout.


Choosing double-drawn human hair bundles is an investment in quality, ease of styling, and sheer volume. It ensures that every layer your stylist cuts has the weight and substance to bounce, flip, and hold its shape through the heat of the season. If you are ready to stop fighting with flat, stringy ends and want to unlock true supermodel volume, look for premium bundle deals that offer double-drawn quality. Your hair will thank you every time you catch your reflection.




Revive Old, Frizzy Human Hair Bundles with Closure

We have all been there. You invest your hard-earned money into high-quality human hair bundles with closure, and for the first few weeks, you feel absolutely unstoppable. The hair bounces effortlessly, the shine is radiant, and the lace blends seamlessly with your scalp. But fast forward a few months down the line, and that pristine unit is looking a little worse for wear. It gets tangled at the nape of your neck, the ends look dry and split, and frizz has taken over completely.


Before you give up and throw your favourite protective style into the trash, take a deep breath. Just because your hair bundles with closure look dry and matted doesn't mean they are completely ruined. Unlike the hair growing directly from your scalp, bundles do not receive natural oils to stay hydrated. Over time, product buildup, heat styling, and environmental factors drain the moisture out of the strands, causing them to rebel.


In this comprehensive guide, we will walk you through the ultimate, step-by-step restoration process to revive your old, frizzy bundles with closure. With a little patience and the right techniques, you can restore that salon-fresh softness and bounce, saving you hundreds of dollars in the process.


Why Do Your Bundles with Closure Get Frizzy and Dry?

To fix the problem, we first need to understand why it happens. When you wear bundles with closure, the hair goes through daily wear and tear. The three biggest culprits behind old, weathered hair bundles are:

  1. Lack of Natural Moisture: Real hair stays moisturized through sebum produced by your scalp. Because bundles are cut from the donor, they have no natural moisture supply.

  2. Product Buildup: Heavy serums, holding sprays, and regular gels accumulate on the hair shaft and the delicate lace material of the closure. This creates a film that blocks moisture from entering the hair.

  3. Friction: Sleeping without a satin bonnet or rubbing against harsh materials like cotton pillowcases, wool coats, and heavy jackets roughens up the cuticle layer, leading to severe tangling.


Restoration Guide for Human Hair Bundles

Step-by-Step Restoration Guide for Human Hair Bundles

Ready to bring your unit back to life? Detach your unit if it is a removable wig, or prepare yourself for a thorough wash day if it is a sew-in installation. Here is exactly how to revive your hair.


Step 1: The Pre-Wash Gentle Detangling

Never apply water to heavily tangled or matted hair bundles; doing so will only lock the knots into place and cause severe shedding.

  • Lay your hair flat on a clean surface or place it securely on a mannequin head.

  • Spray a light leave-in conditioner or a mixture of water and conditioner onto the hair.

  • Carefully remove tangles with a wide-tooth comb or a detangling brush by working in small sections. Begin at the ends of the hair and gradually move upward toward the roots, allowing knots to loosen gently without causing unnecessary pulling or breakage.

  • Be exceptionally gentle around the closure area. The individual strands are hand-tied into the lace, and rough tugging will cause permanent bald spots on your unit.


Step 2: Clarify to Remove Heavy Buildup

Standard hydrating shampoos won’t cut through months of styling gels and hairsprays. You need a clarifying shampoo to strip away the stubborn residue.

  • Fill a basin or sink with the lukewarm water and mix in a generous amount of sulfate-free clarifying shampoo.

  • Submerge your human hair bundles with closure into the water.

  • Do not rub or massage the hair aggressively in a bunch, as this causes immediate matting. Instead, use a gentle stroking motion from the top down, running your fingers through the strands.

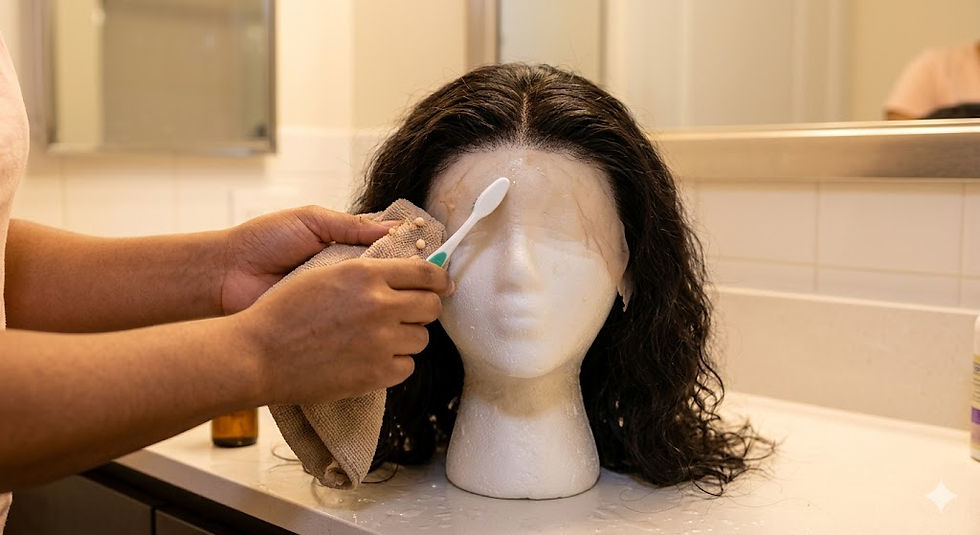
  • Use a soft toothbrush dipped in soapy water to gently clean any leftover makeup, glue, or tint spray off the lace material. Rinse thoroughly with lukewarm water.


Step 3: The Deep Conditioning Boiler Method (The Ultimate Secret)

If your hair feels like straw, standard conditioning won't cut it. The "boiling" or deep conditioning soak method is an absolute game-changer for reviving old hair.

  • Fill a heat-safe bowl with hot water (not boiling, but hot to the touch) and add 2–3 tablespoons of a deep conditioning mask, along with a few drops of an essential oil like argan or jojoba oil. Mix until fully dissolved.

  • Apply a thick layer of the deep conditioner directly to the damp hair bundles, keeping it mostly away from the knots on the lace to prevent shedding.

  • Place the hair inside a plastic Ziploc bag or wrap it in plastic cling wrap to trap the heat.

  • Let the hair sit and marinate in the warmth for at least 1 to 2 hours. This opens up the parched hair cuticles, allowing the rich moisture to penetrate deep into the cortex.


Step 4: The Cold Water Rinse and Air Dry

Once the soaking time is up, rinse the hair thoroughly. Always use cool or cold water for the final rinse. Cold water seals the hair cuticles flat, which locks in the moisture and creates a smooth, reflective shine.


Once the hair is clean, use a microfiber towel or a soft cotton T-shirt to carefully blot away excess water. Pat the hair dry instead of rubbing it to help preserve its texture and prevent unnecessary frizz or damage. Avoid rubbing the hair, as this can cause frizz and unnecessary damage. Avoid rough towel-drying at all costs. Lay the unit flat on a towel or hang it up to air dry completely. Avoid using a blow dryer at this stage, as you want to give the hair a complete break from heat manipulation.


Reviving Old Hair
Reviving Old Hair

Pros, Cons, and Frequently Asked Questions about Bundles Care

Restoring your old hair is highly effective, but it helps to weigh expectations realistically while managing your collection of bundles and closure wigs.

The Pros & Cons of Reviving Old Hair

  • Pro: Saves you a significant amount of money compared to purchasing a brand-new set of bundles.

  • Pro: Reduces environmental waste by extending the lifespan of your beauty products.

  • Pro: Softens the hair texture, making daily styling significantly quicker and easier.

  • Con: Severely damaged hair will never fully return to its 100% factory-virgin state.

  • Con: The restoration process takes time, patience, and can be messy if you are working with long, dense bundles.

Frequently Asked Questions (FAQs)

Q: Can I use this restoration process on synthetic hair?

A: No, this deep-soak method is designed strictly for human hair. Synthetic fibers are made of plastic and will melt or frizz further if exposed to intense heat or heavy oils.

Q: How often should I wash my hair bundles with closure?

A: If you wear them daily, aim to wash them every 2 to 3 weeks. Washing wig too frequently strips the hair of moisture, while waiting too long causes heavy product buildup.

Q: My closure is balding, can I fix it with this method?

A: Unfortunately, no. This method revives the texture of the hair strands. If the hair has shed from the lace base, the only solutions are to replace the individual piece or ventilate new hairs into the lace, which requires professional work. This is why gentle brushing is so critical.


Keep Your Hair Looking Flawless

Conclusion: Keep Your Hair Looking Flawless

Reviving your old, frizzy human hair bundles with closure doesn't require magic—it simply requires moisture, patience, and the right care routine. By stripping away old product buildup with a clarifying wash and infusing deep hydration back into the cuticles with a long, warm soak, you can easily breathe the new life into your favorite units. Remember to treat your lace gently, brush from ends to roots, and always protect your hair at night.


🔥 Insider Alert! Ready to upgrade your collection or replace an old unit? Our massive Summer Sale is happening right now! Get 25% off your entire order, or unlock an exclusive 30% off as an Insider. Join our inner circle now for instant savings and step into the season with flawless hair!


Critical Mistakes That Ruin Your Lace Front Human Hair Wigs

Investing in premium lace front human hair wigs is one of the best beauty decisions you can make. The styling flexibility, the realistic movement of the strands, and the confidence boost they provide are unmatched. However, because lace front wigs human hair units are made from genuine human hair knotted onto a delicate mesh base, they require a specific level of care to survive the daily wear and tear.

Too often, simple, unnoticed habits end up shedding the hair, ripping the lace, or matting the texture within just a few months. If you have noticed your expensive units losing their luster, balding at the crown, or feeling stiff, you might be accidentally damaging them.

Let's dive into the five critical mistakes that ruin your lace frontal wigs human hair investments, how they happen, and the exact step-by-step methods to fix them so your hair stays flawless for years.

Scratching an Itchy Scalp

1. Scratching an Itchy Scalp Through the Mesh

We have all been there—your natural hair underneath gets a sudden, intense itch, and without thinking, you dig your fingernails or the tip of a rat-tail comb straight through the wig to scratch it.

Why It Destroys the Wig

The base of lace frontal wigs human hair is incredibly fragile. Each individual strand of hair is carefully hand-tied to a delicate Swiss or HD lace mesh using tiny micro-knots. When you scratch or poke through the lace, you do two things: you loosen those delicate knots, causing immediate and irreversible shedding, and you risk tearing the actual lace fabric. Once a hole or a bald spot forms at the front of your wig, it is incredibly difficult to repair without replacing the entire frontal piece.

The Fix

Never scratch through the lace. If your scalp is itching, it is usually a sign of dryness, product buildup, or trapped moisture beneath your wig cap.

  • The Pat Method: Gently pat or tap your head with the flat of your hand to relieve the itch without creating friction on the lace.

  • Targeted Scalp Serums: Use an applicator bottle with a long, thin nozzle to slide underneath the edge of your wig cap and apply an anti-itch, tea tree, or peppermint oil directly onto your natural scalp.

  • Keep Prep Clean: Always ensure your natural hair is completely dry before installing a wig. Braiding damp hair creates a breeding ground for bacteria and itchiness.


Over-Bleaching the Knots

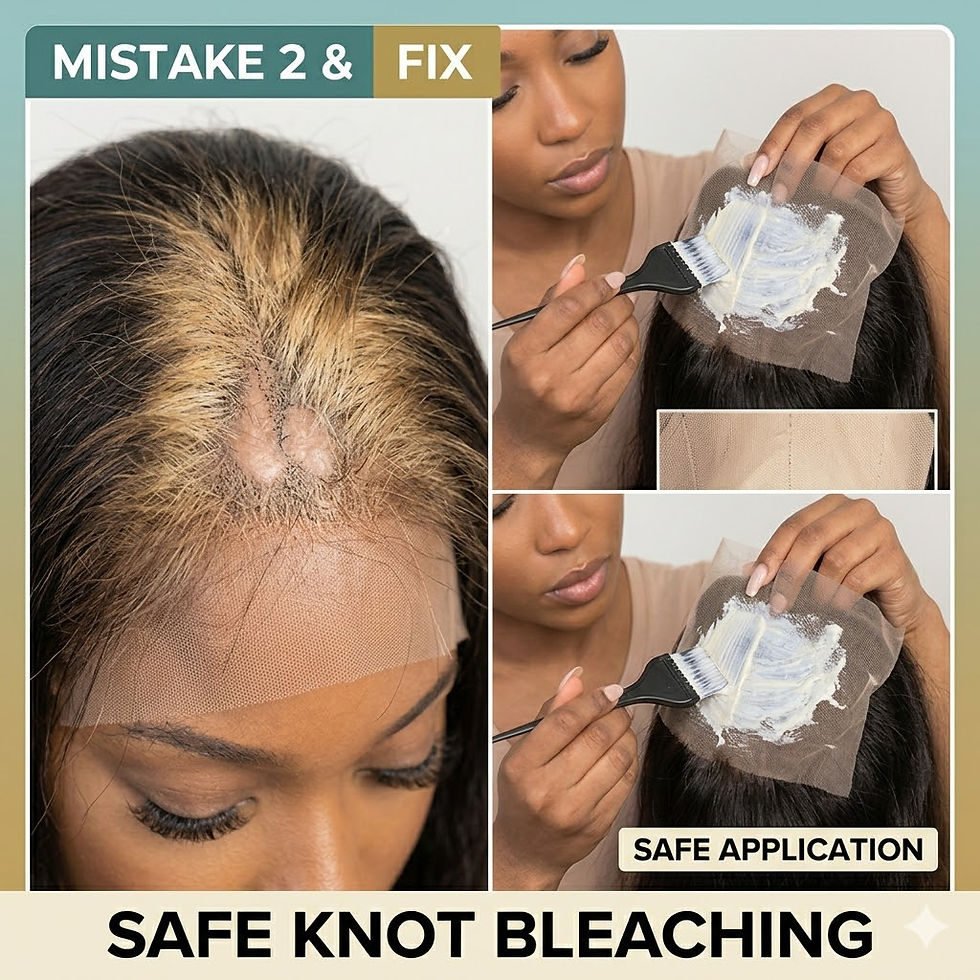
2. Over-Bleaching the Knots and Over-Plucking the Hairline

To get that highly coveted "scalp-like" look, customizing the unit is essential. However, the line between a beautifully customized hairline and a ruined frontal is very thin.

Why It Destroys the Wig

Bleaching the knots involves applying hair lightener to the underside of the lace to strip the dark pigment from the tiny knots. If you leave the bleach on for too long, or use a developer that is too strong, the chemical reaction expands and deeply weakens the hair structure right at the base. It essentially cooks the root of the hair. Within two or three washes, the hair will begin snapping off at the knot, leading to a massive bald patch. Similarly, aggressive, uneven plucking with tweezers snaps the lace threads and thins out the hair permanently.

The Fix

Approach customization with patience and moderation.

  • Keep Bleach Thick: When bleaching your knots, mix your lightener to a thick, paste-like consistency (similar to frosting). If it is too runny, it will seep through the lace holes and bleach the roots of the actual hair, causing processing damage.

  • Time It Right: Use a 20-volume developer instead of a harsh 30 or 40-volume, and never leave the bleach on for longer than 15 to 20 minutes. Keep a close eye on it.

  • Pluck Safely: When plucking the hairline to create a gradient effect, always pluck in the direction the hair falls, never hold the tweezers at an angle that catches the lace mesh, and move the tweezers around constantly to avoid thinning one spot too much.

Applying Heat Directly

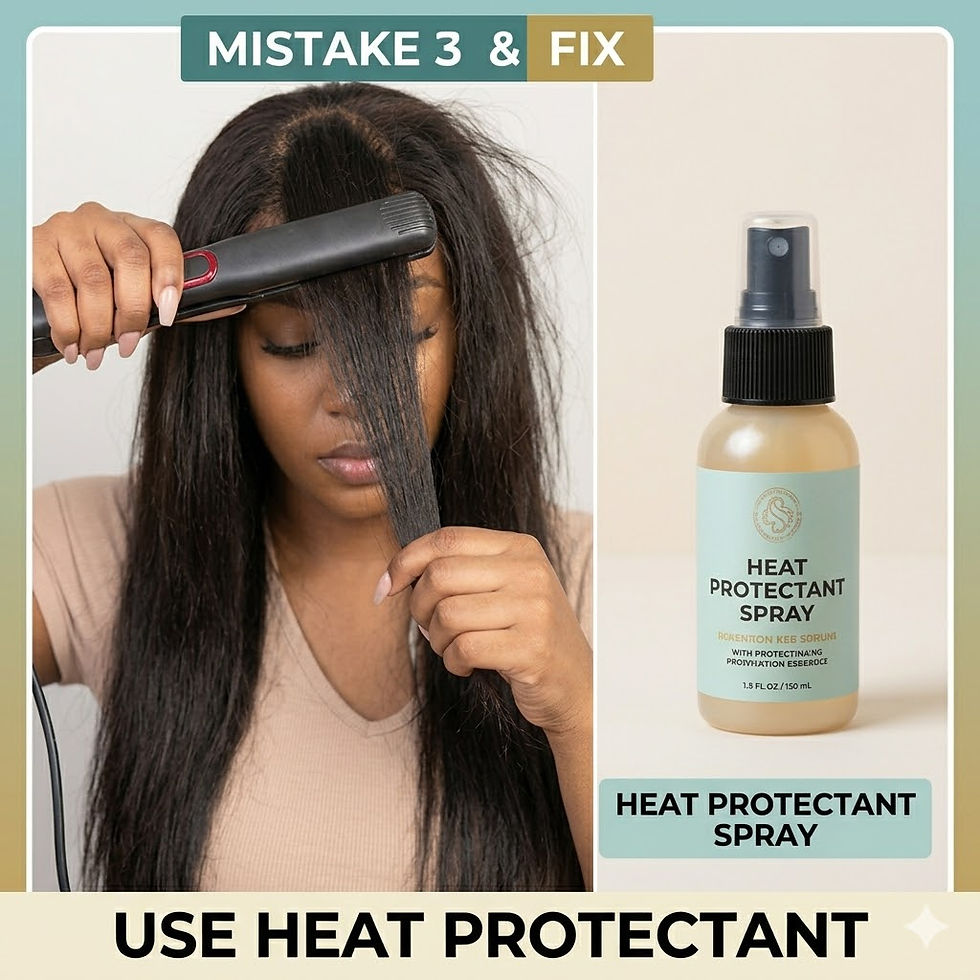
3. Applying Heat Directly to the Root and Lace

Using flat irons, curling wands, and hot combs is a great way to keep your lace front wigs human hair looking sleek and laid. However, excessive, direct heat is a silent killer for both the hair strands and the lace foundation.

Why It Destroys the Wig

When you take a hot comb at 450°F and press it firmly against the top of your wig to get it completely flat, you are exposing the tiny hand-tied knots to intenseLace Front Human Hair Wigs thermal stress. High heat can literally melt synthetic stitching threads, singe the delicate lace fibers, and dry out the human hair roots so badly that they snap. This results in dry, brittle flyaways right at your parting space, making the wig look frizzy and unkempt.

The Fix

You can achieve a completely flat, realistic lay without frying your unit.

  • Lower the Temperature: Turn your hot tools down. Human hair extensions do not receive continuous moisture from a natural scalp, meaning they burn much easier. Keep your tools between 300°F and 350°F.

  • Use a Heat Protectant: Always spray a lightweight thermal protectant over the hair before styling.

  • The Scarf Method: Instead of relying entirely on a hot comb to flatten the top of your wig, apply a small amount of lightweight styling mousse, comb the hair into place, and tie it down firmly with a silk or satin wrap scarf for 15 minutes while it air-dries.

4. Using Heavy Oils, Greases, and Alcohol-Based Products

It is natural to want to care for your human hair wig the same way you care for the hair growing out of your head. However, using heavy pomades, thick hair greases, or alcohol-heavy styling products will quickly ruin the unit.

Why It Destroys the Wig

Heavy products weigh the hair down, causing it to lose its bounce, body, and natural movement. Because a wig doesn't have a way to wash out oils naturally, grease builds up on the hair shaft and traps dirt, sweat, and old adhesive. This leads to severe tangling, matting, and a dull, stringy appearance. On the flip side, using products with high alcohol content (like cheap hairsprays or styling gels) strips the processing moisture completely out of the hair, turning a soft texture into a dry, straw-like mess.

The Fix

Switch to lightweight, salon-grade products formulated for processed hair extensions.

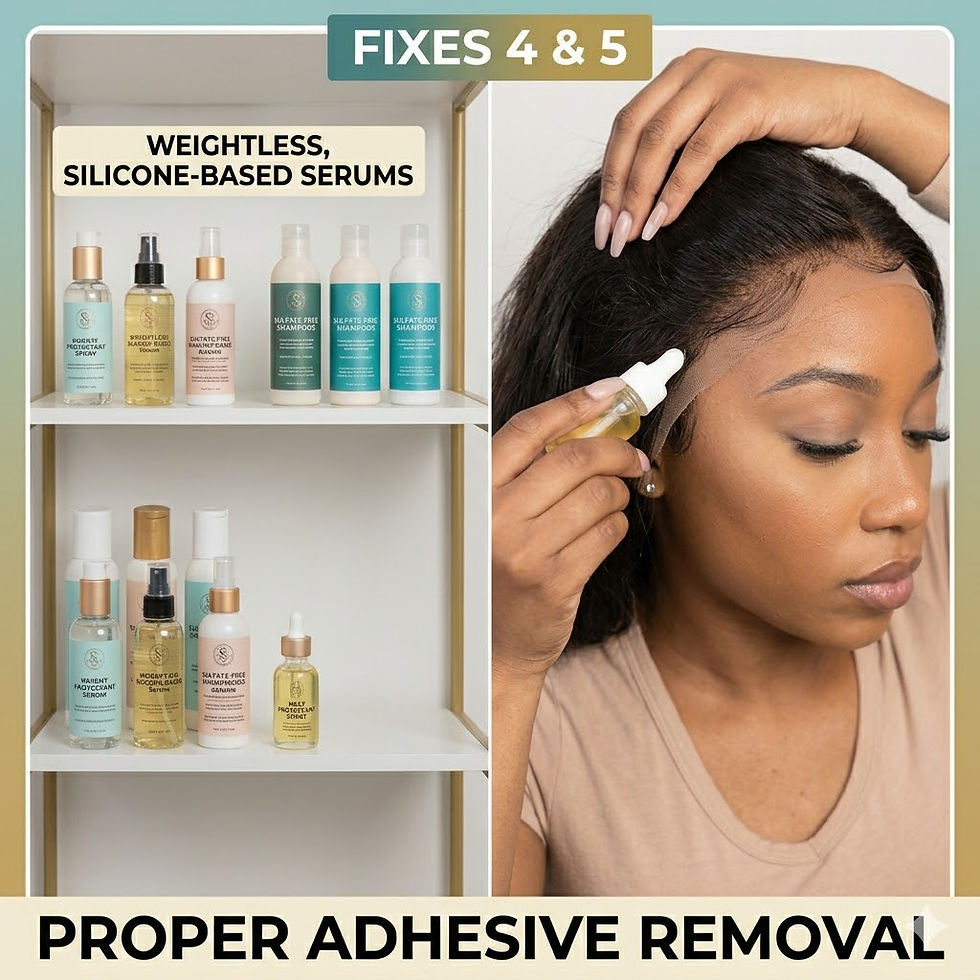
  • Less Is More: Keep your daily routine simple. A tiny, dime-sized drop of a high-quality, silicone-based hair serum is all you need to seal moisture into straight wigs or body wave textures.

  • Focus on Moisture: Wash your wig with sulfate-free, moisturizing shampoos and deep-conditioning treatments. When rinsing out conditioner, always use cool water to lock the hair cuticles flat.

  • Specialty Care for Textured Wigs: If you are rocking textured or human hair afro wigs, avoid heavy gels to define the curls. Instead, use a lightweight leave-in conditioner spray mixed with water and a dollop of alcohol-free curl mousse to keep the afro-textured coils soft, defined, and voluminous without getting crunchy.

Ripping the Wig Off During Removal

5. Ripping the Wig Off During Removal

After a long day or week of wearing your unit, it is incredibly tempting to just grab the lace and pull the wig off your head. This is perhaps the fastest way to completely destroy an expensive install.

Why It Destroys the Wig

Whether you use layers of freeze spray, traditional lace glue, or melting tapes, these adhesives are designed to form a powerful bond with your skin. Forcing the wig off without properly breaking down that bond will stretch out the front of the lace, warp its shape, tear the delicate mesh, and pull the hair strands right out of the perimeter. Even worse, it will pull out your natural edges and cause severe damage to your actual skin line.

The Fix

Always use a dedicated adhesive remover or a safe DIY breakdown method.

  • Use a Dedicated Remover: Spray a generous amount of an oil-based lace glue remover or a 91% isopropyl alcohol solution along the glued perimeter.

  • Let It Sit: Give the product 2 to 3 minutes to actually dissolve the adhesive. You will know it is ready when the lace begins to lift away from your skin on its own without any tugging.

  • Clean the Lace Immediately: Once the wig is off, gently wipe away any leftover gooey residue from the lace using a microfiber cloth and rubbing alcohol. Leaving old glue on the lace causes it to cake up, turning the front of your wig a ghostly gray color during your next install.

Pros, Cons & Frequently Asked Questions

To give you a quick reference guide on managing lace front units effectively, let’s break down the essential balance of owning these pieces alongside answers to common maintenance concerns.

The Reality of Lace Front Human Hair Wigs

  • Pros: Offers an incredibly natural, seamless look that mimics a real hairline; highly versatile styling options (can be parted in multiple directions at the front); lightweight, breathable, and comfortable for extended wear.

  • Cons: Requires consistent, delicate maintenance; higher upfront cost compared to traditional closure wigs; customization can easily go wrong if rushed.

FAQ: How often should I wash my lace front human hair wig?

If you wear your wig daily, you should wash it every 10 to 14 days. Washing it too frequently will strip the hair of its remaining moisture while neglecting to wash it allows product buildup to cause tangling and matting.

FAQ: Can I sleep in my lace front human hair wig?

While it is best to remove your wig at night to preserve the lace, if your unit is glued down, you can sleep in it safely. Always detangle the hair, braid it into a couple of loose sections, and secure it inside a silk or satin bonnet, wrapping the perimeter with a satin edge scarf to keep the lace from lifting due to friction against your pillowcase.

FAQ: Why is the lace on my human hair afro wigs stiff and visible?

Human hair afro wigs often require specific styling products to maintain their beautiful kinky-curly volume. If the lace looks stiff or visible, it is likely because heavy curl creams or holding gels have migrated onto the mesh. Keep your styling products focused on the mid-lengths and ends of the hair, and clean the lace frontal area with warm water and a soft toothbrush after styling.


Beautiful Lace front human hair wigs

Conclusion

Lace front human hair wigs are beautiful, long-lasting investments, but they are only as good as the care you provide. By protecting the delicate lace base from sharp scratching, pacing yourself during the customization process, using low heat settings, selecting lightweight products, and taking your time during removals, you can easily double or triple the lifespan of your units. Treat your lace with gentle hands, keep the hair properly hydrated, and your wigs will continue to deliver a flawless, natural melt look every single time you put them on.


© 2035 by Annabelle. Wix

LET'S TAKE IT TO THE NEXT LEVEL

Thanks for submitting!

bottom of page